Data Connectors#
The ConverSight platform utilizes data connectors for connecting data from a variety of sources, including databases, spreadsheets, cloud storage and APIs. ConverSight provides 120+ data connectors. These tools allow for easy access and retrieval of data from these sources.
Accessing Data Connectors#
The Data Connector is accessible and can be created from the Data Connectors section within the Data Workbench menu.
To commence the data import process, go to the Data Workbench section in your ConverSight platform. You can achieve this by expanding the sidebar using the triple bar at the top left corner and choosing the Data Connectors option.
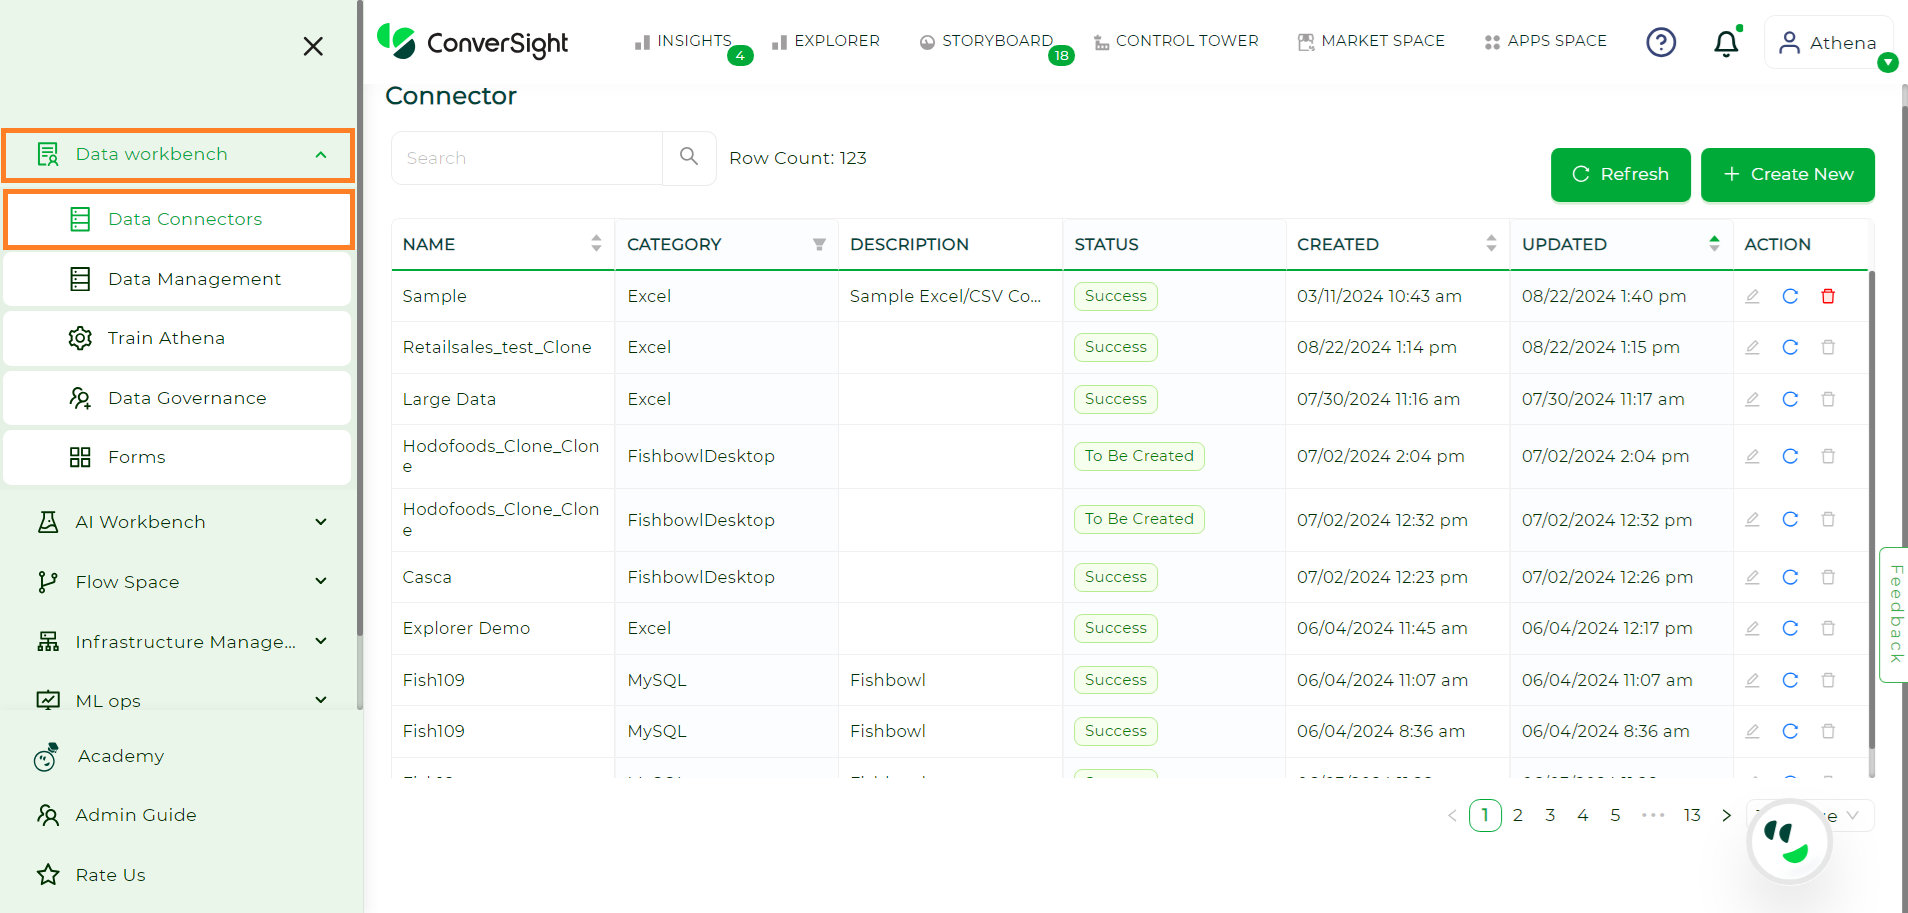
Data Connectors#
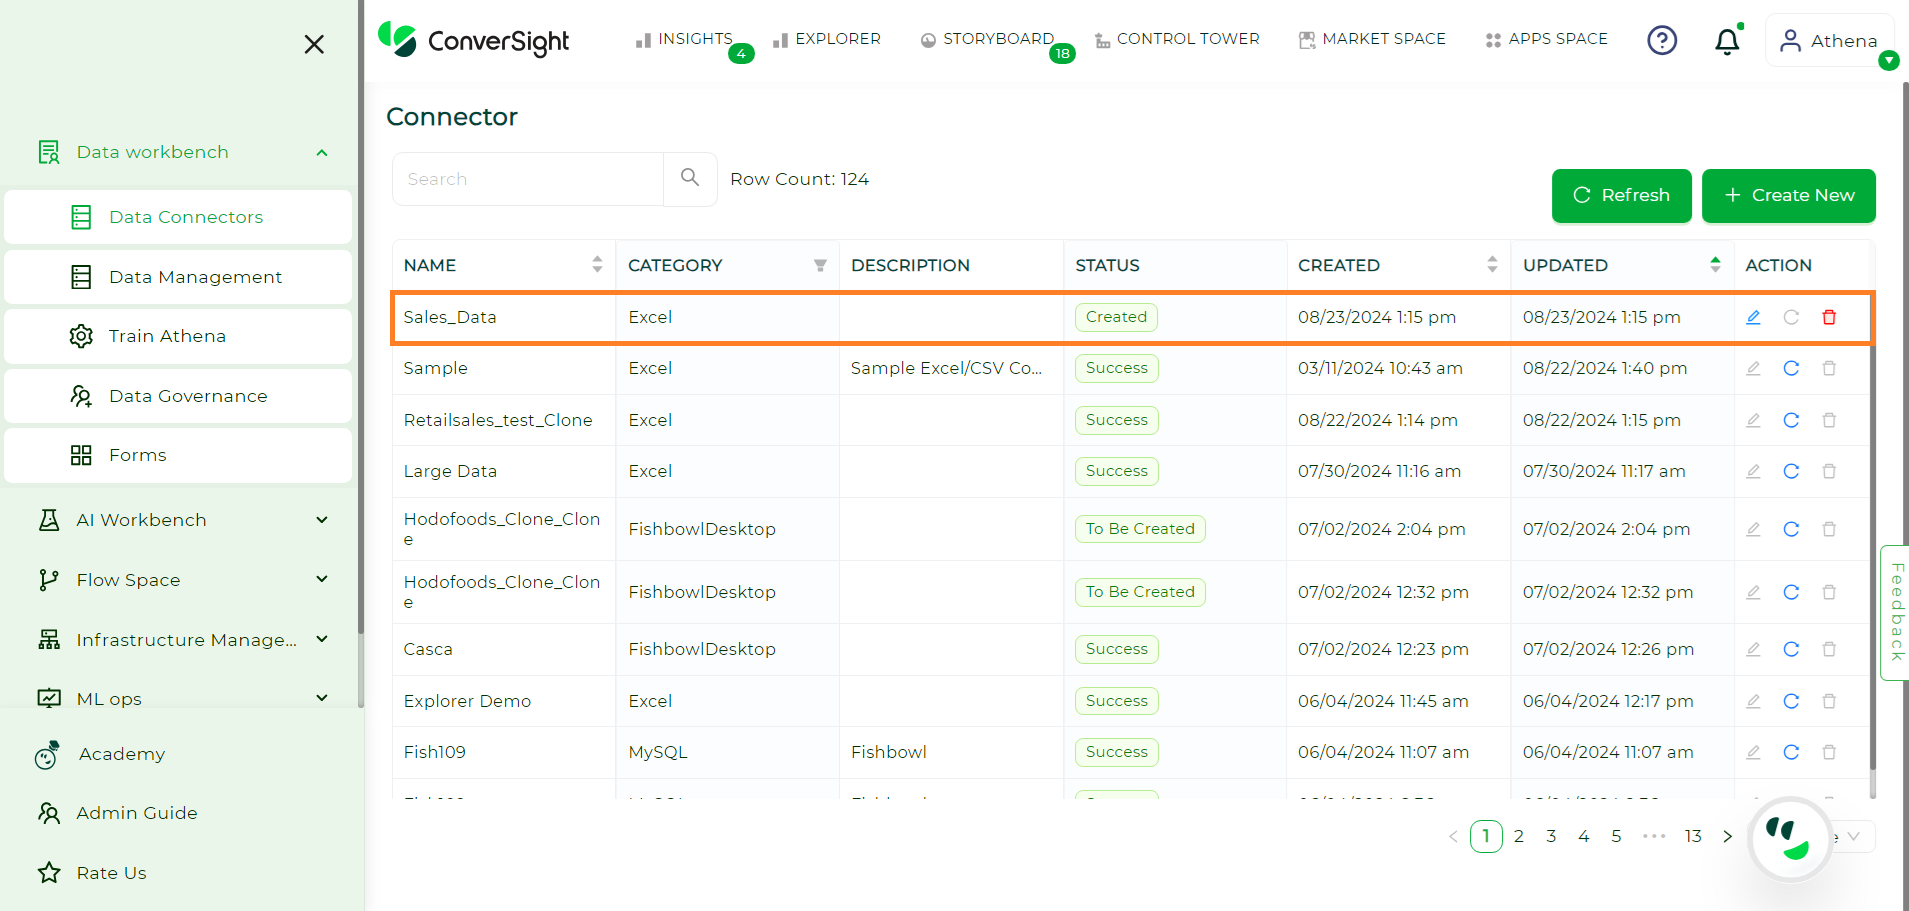
The Data Connectors page will display a list of all the connectors created in your organization. The comprehensive details of each data connector are presented below.
Argument |
Description |
|---|---|
Name |
Displays the name of the connector. |
Category |
Displays the type of connector. |
Description |
Displays the description provided during connector creation. |
Status |
Displays the state of validation of the connector. |
Created |
Displays the created time. |
Updated |
Displays the last updated time. |
Action |
This column allows you to edit, refresh and delete the connector. |
NOTE
The refresh option is available for connectors created by both yourself and other users.
To create a new connector, click on the Create New button.
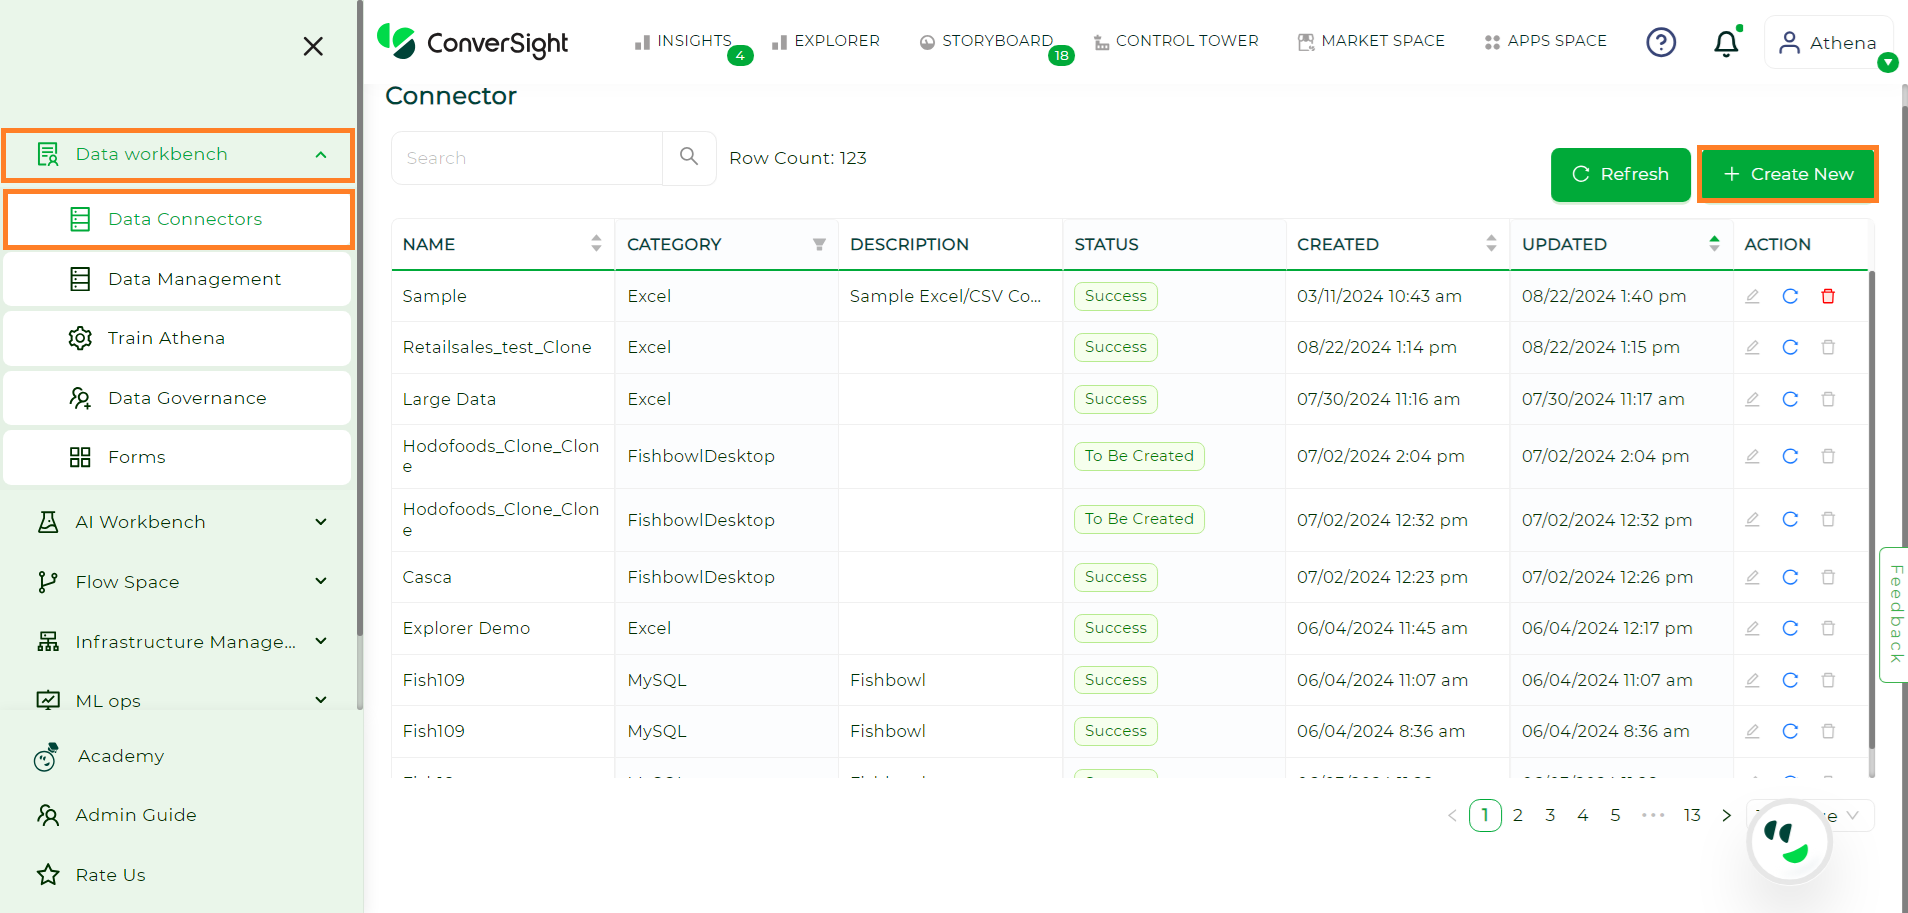
Creating Data Connectors#
On the Create Connector page select your desired connector from all available connectors and click on the Next button.
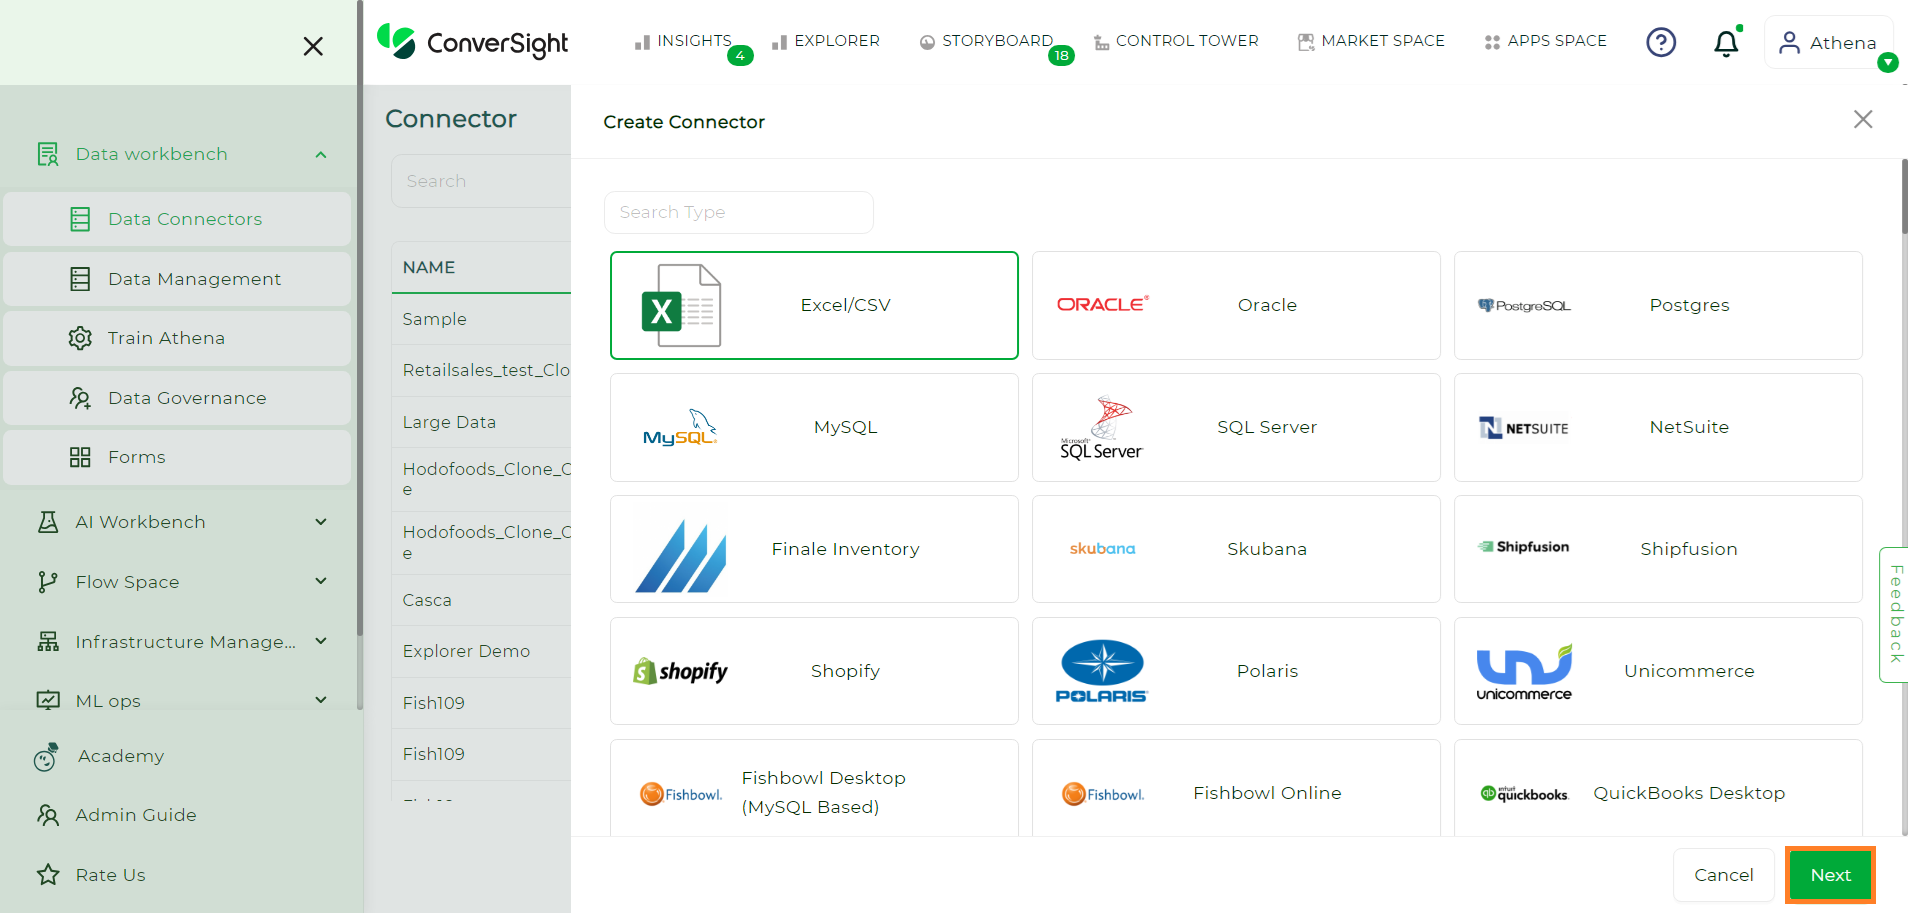
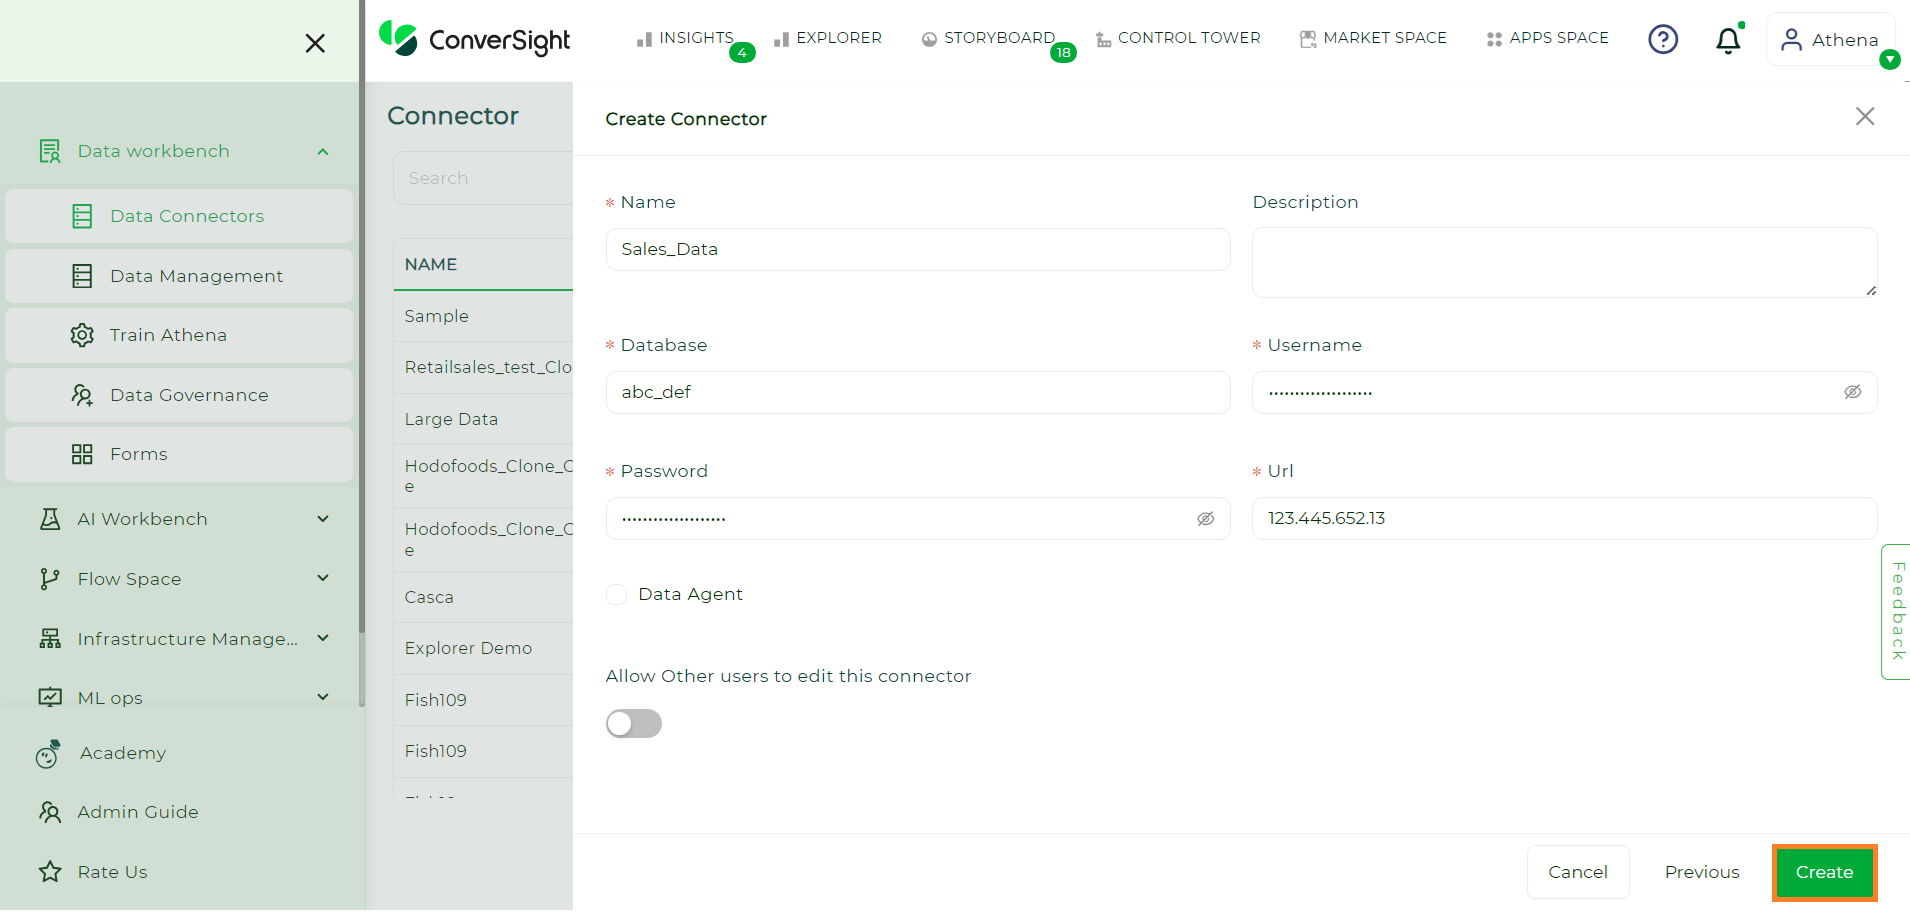
Creating Data Connectors#
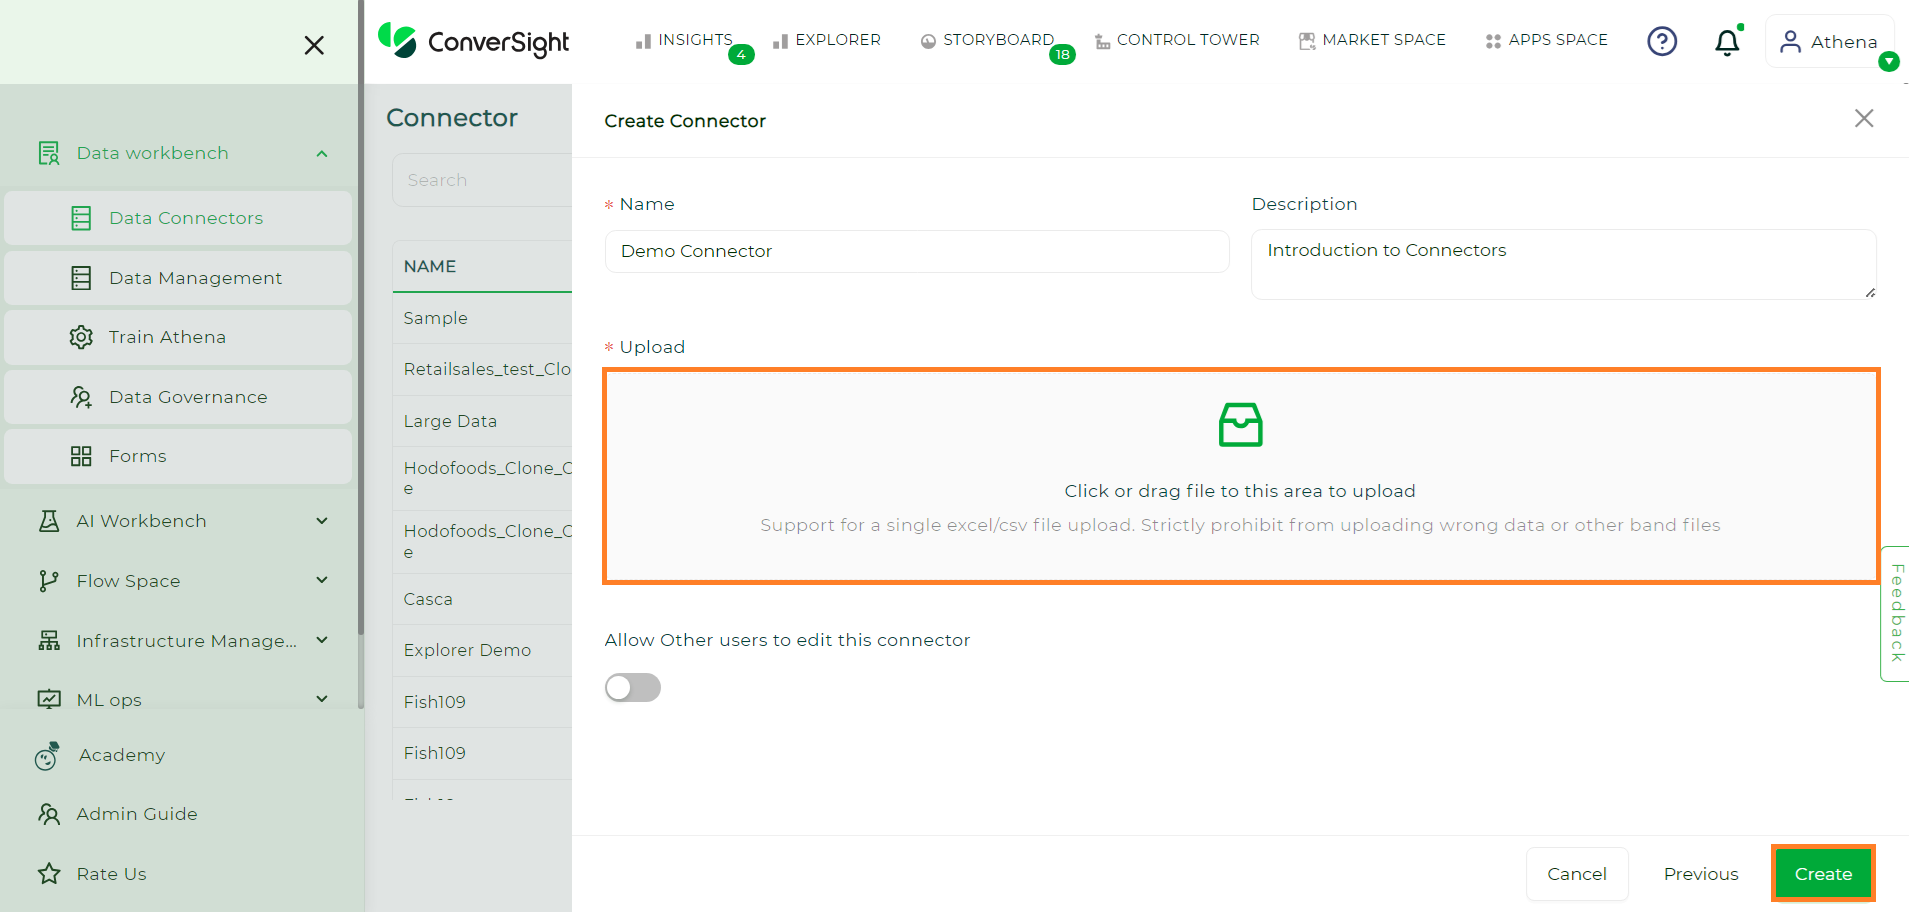
Users must provide inputs for all the required fields, which may vary depending on the chosen connector type. The Allow Other Users to Edit this Connector toggle when enabled grants other users the privilege to modify details of any connector. Then, click Create to initiate the data import.
Creating Data Connectors#
For Excel/CSV connector users should upload their Excel/CSV files and then click on the Create button.
Creating Data Connectors#
NOTE
Import failure might occur because of invalid data or an incorrect data format in the file. In case of failure, a message will be displayed indicating the error, allowing users to address it and re-upload the Excel/CSV file.
After importing the data, it is important to verify its accuracy. To do this, you can check the status of the data connection on the Data Workbench - Data Connectors page. ConverSight conducts a series of validation checks to guarantee the quality of the insights and analytics produced. Once the status changes from Created to Success, a pop-up message will notify you that Success - Your Connector is ready for use.
Validation State |
Description |
|---|---|
Created |
Once the details and credentials of the selected connector have been submitted, the initial status is labelled as Created. |
Accepted |
The Connector transitions to the Accepted status after successfully validating the submitted credentials. |
Validation In Progress |
At this status, the uploaded connector undergoes validation to ensure the presence of all tables and columns, a status specific to Excel and CSV files. |
Success |
Upon meeting all validation conditions, the connector’s status changes to Success, indicating its readiness for use. |
Failed |
If the connector fails to meet the validation conditions, its status changes to Failed and the reason for the failure can be viewed by hovering over the connector’s status. |
Creating Data Connectors#
Editing Connectors#
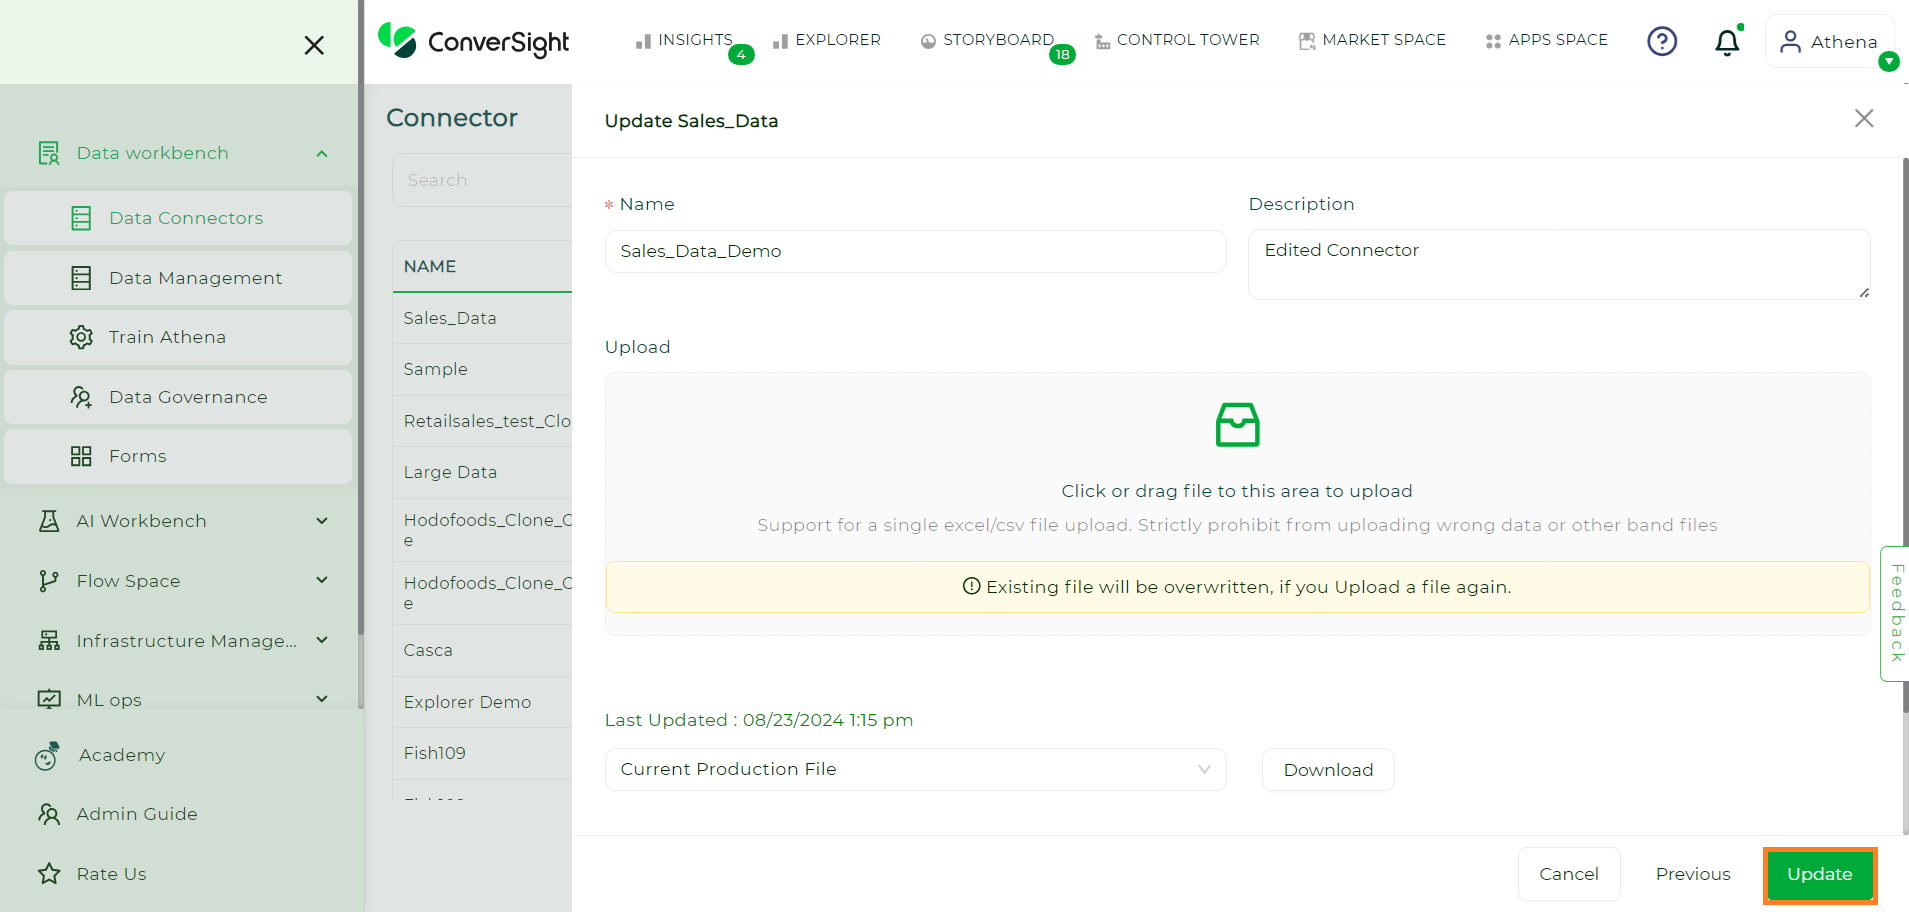
Users have complete privileges to modify all the inputs of the Data Connector allowing them to change and update the created Data Connector as required.
Click the Edit icon associated with the specific connector to make edits.
Editing Data Connectors#
Once done click on the Update button to save the changes.
Updating Data Connectors#
NOTE
Editing or Deleting the Connectors created by other users is restricted.
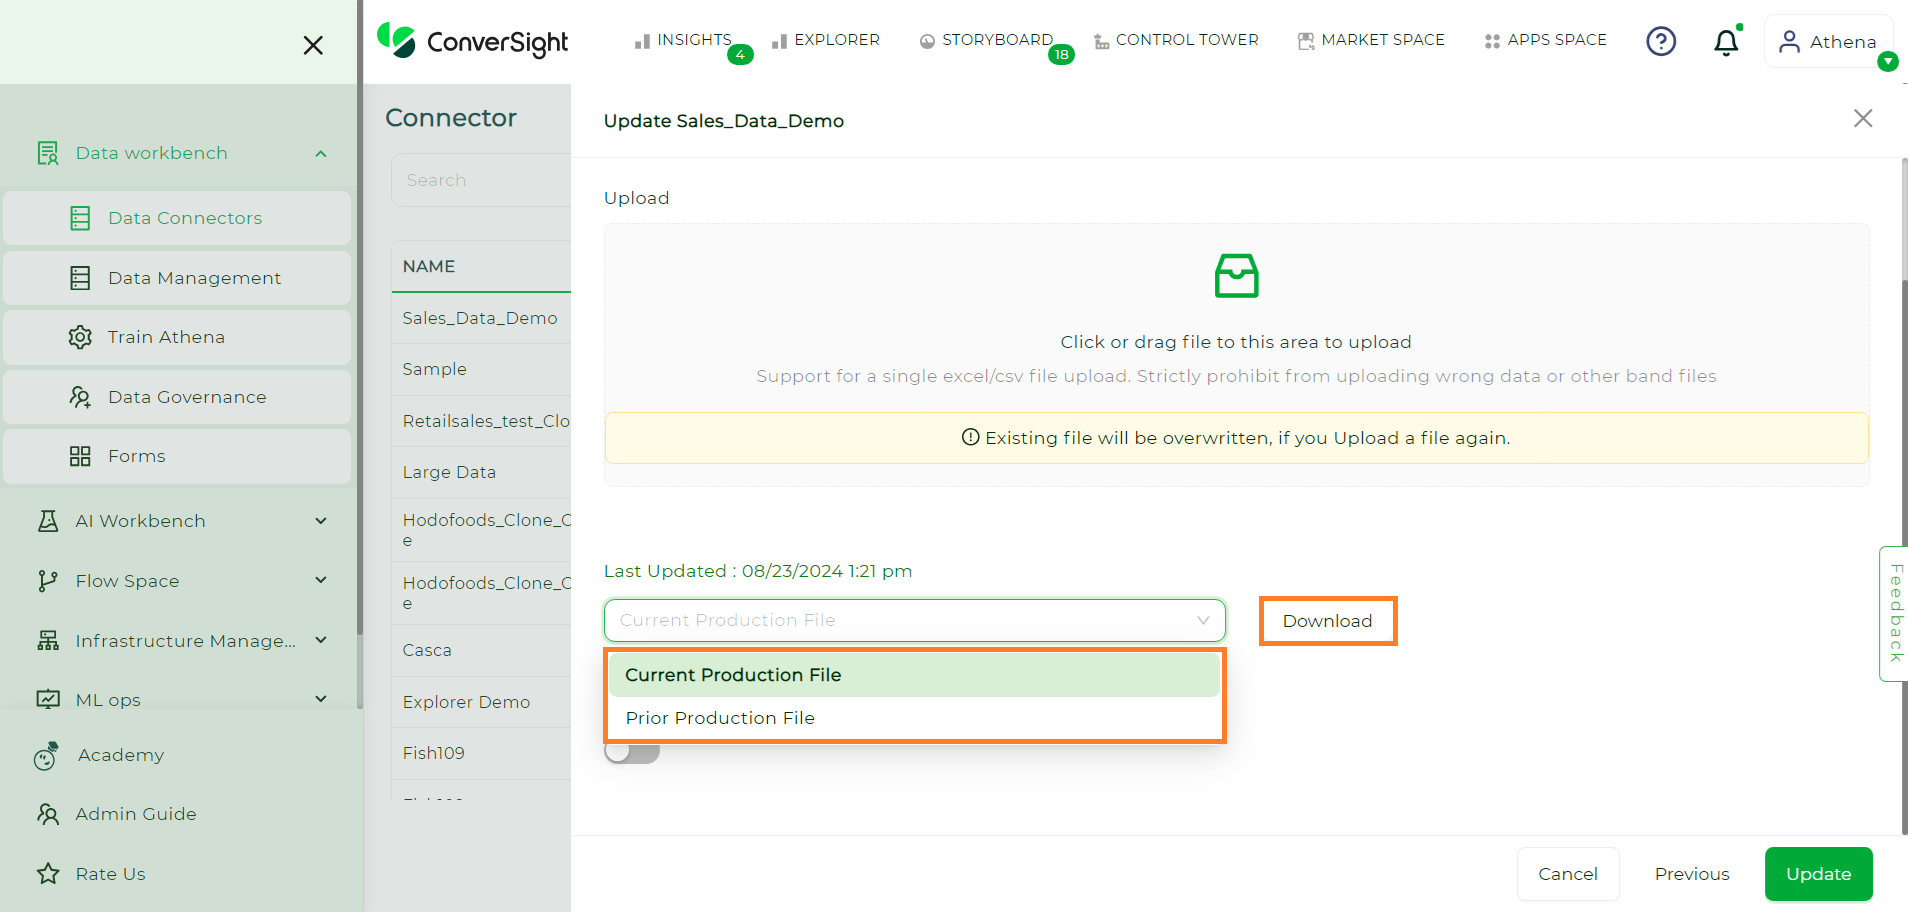
Downloading Data#
To download data from the connector, click the Edit icon for the designated connector. On the Update Connector page, utilize the dropdown menu, which presents two download options:
Current Production File - The currently active file is in use.
Prior Production File - The file that was active before the current production file.
After making your selection, click the Download button to initiate the file download.
Downloading Data#
NOTE
This feature is specific to the Excel connector. When modifying it, ensure all previously loaded columns are preserved, even if the new Excel file has additional columns or changes to existing data. Do not remove any existing columns.
Deleting Connectors#
You can delete connectors by clicking on the Delete icon associated with the chosen connector.
Deleting Data Connectors#
NOTE
Deleting the Connector, Table or Column in a dataset if it includes a column used in Calculated Fields, Summary Fields or Smart Query is resticted. To delete the associated Connector, Table or Column, it is essential to remove the associated column or columns from the Custom Field or delete the Custom Field.
In conclusion, once the data has been successfully uploaded and validated, it is ready for analysis. The process of uploading data into the ConverSight platform involves connecting to the data source, specifying the data to be imported, logging in to the platform, importing the data, validating the data and finally analyzing it. With the use of a data connector, the process is streamlined and enables the efficient centralization of data from various sources for analysis and visualization. This empowers informed decision-making through advanced analysis and the uncovering of insights.
To watch the video, click on Importing Data into ConverSight Platform.